Solar energy is becoming an increasingly popular way for homeowners and businesses to take control of their energy costs. Every year, solar saves consumers billions on utility bills while providing clean, reliable power.
At its core, a solar energy system is simple: it captures sunlight and turns it into free electricity, requiring no moving parts and little upkeep.
However, there’s much more to a solar system than just the panels. The electricity that a solar system generates needs to be converted into a usable form before it can power your home or be sent back to the grid. That’s where other components come in. In this article, we’ll break down each component, showing how they work together to power your home or business efficiently.
Table of Contents
Overview of Solar System Components
Before we get started, here is a quick list of the components found in a typical solar system:
- Solar panels (modules): Capture sunlight and generate electricity
- Inverters: Convert the generated electricity into usable AC power
- Racking and mounting systems: Secure the panels in place
- Batteries: Store energy for off-grid or hybrid systems
- Charge controllers: Regulate power flow in certain setups
- Disconnect switch: Allows for safe system shutdown when needed
- Bi-directional electric meter: Tracks energy flow between your system and the grid
Together, these components capture sunlight and convert it into reliable, usable power for your home. Below, we’ll take a closer look at how each piece works.
Solar Panels (or Solar Modules)
In just over an hour, the sun sends more energy to Earth than all the people in the world use in a year. Solar panels turn that free sunlight into power.
Solar panels, also called solar modules, contain photovoltaic (PV) cells that generate electricity when exposed to sunlight. The sunlight energizes the cells, causing electrons to move and produce an electric current.
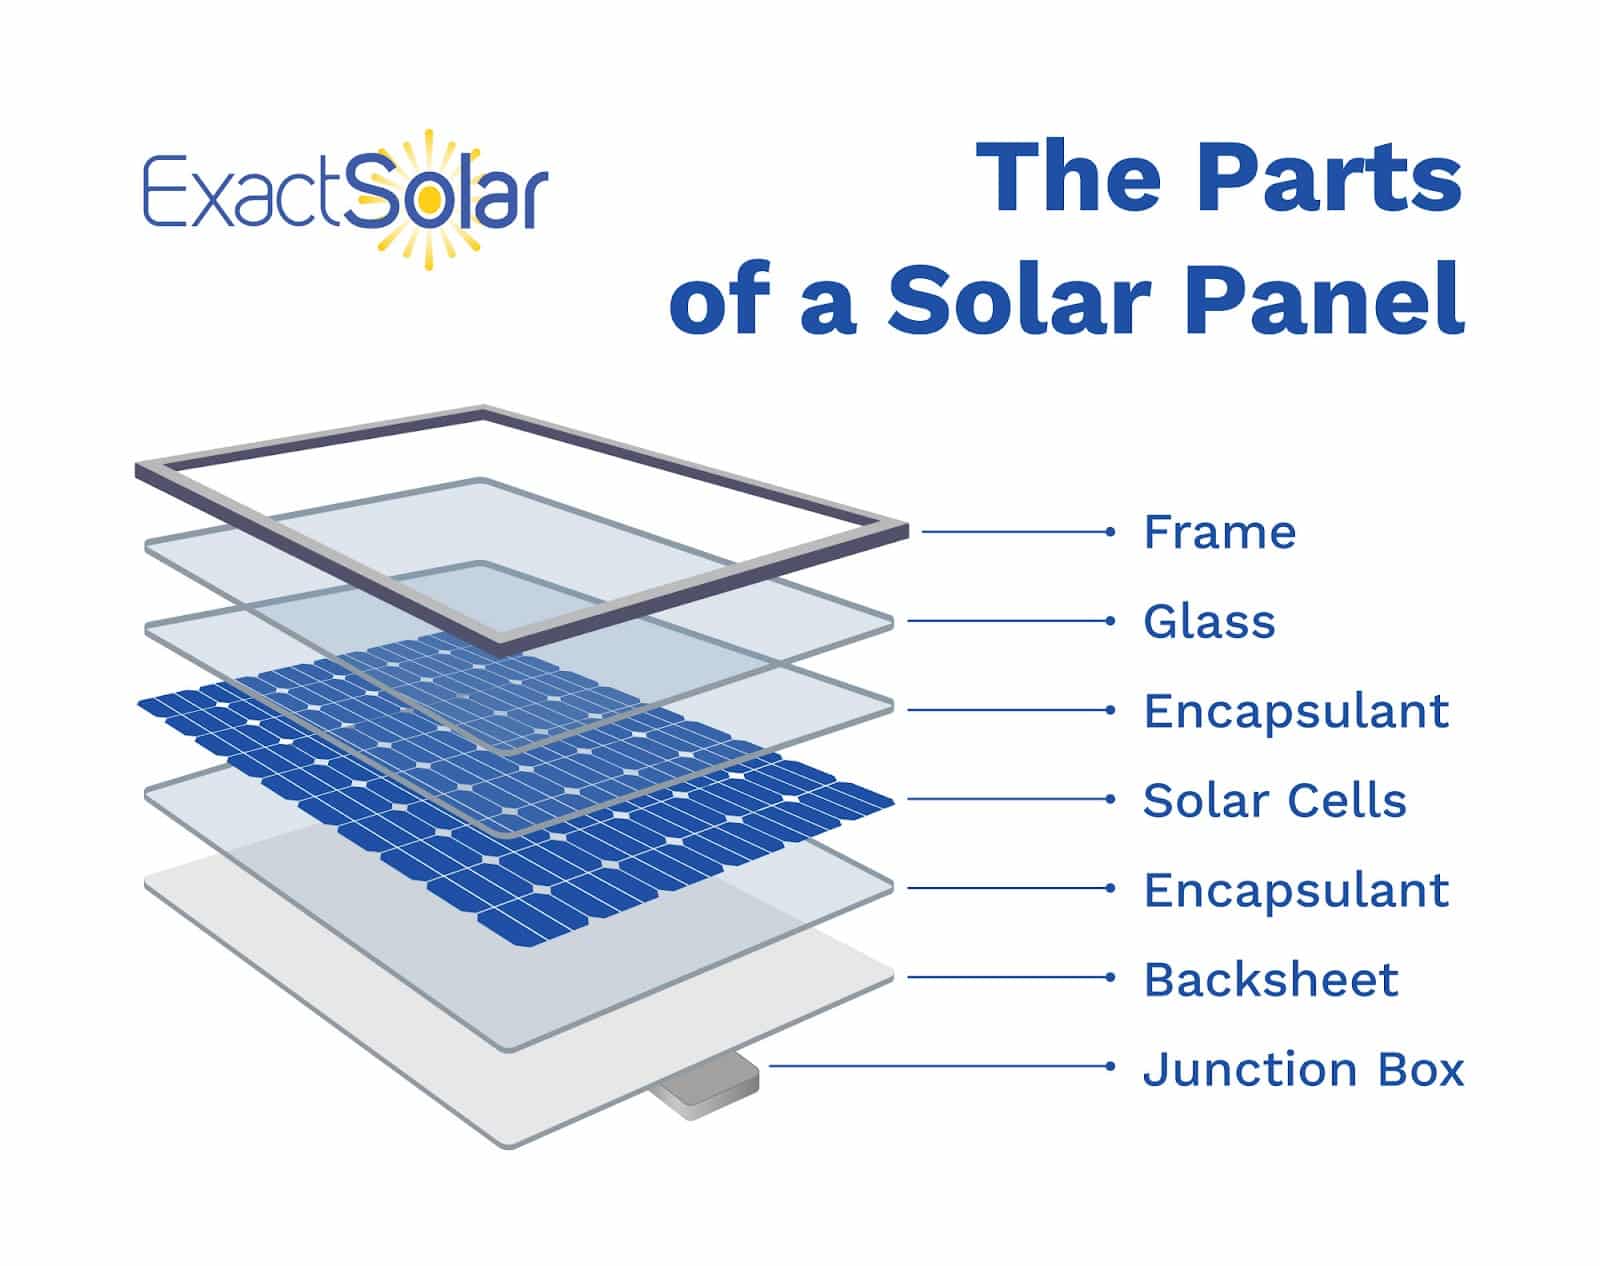
Each PV cell is made from a semiconductor, most commonly silicon. Silicon is used in over 95% of PV cells because it’s abundant and relatively inexpensive. The manufacturing process involves melting and refining polysilicon to create pure silicon ingots. These ingots are then sliced into thin wafers and assembled on layers of glass in a grid pattern.
The average panel contains 60 to 72 cells, but the exact number depends on the panel’s size and whether it’s intended for residential or commercial installations. When sunlight falls on these cells, they capture and convert it into electrical energy.
The visible grid of cells within each panel is where the actual energy conversion takes place. Although many modern panels now have an all-black design for a more streamlined look, the principle is the same: photons from sunlight strike the silicon wafers, dislodging electrons that generate a direct current (DC).
In the photo below, you can clearly see the cells within each panel.
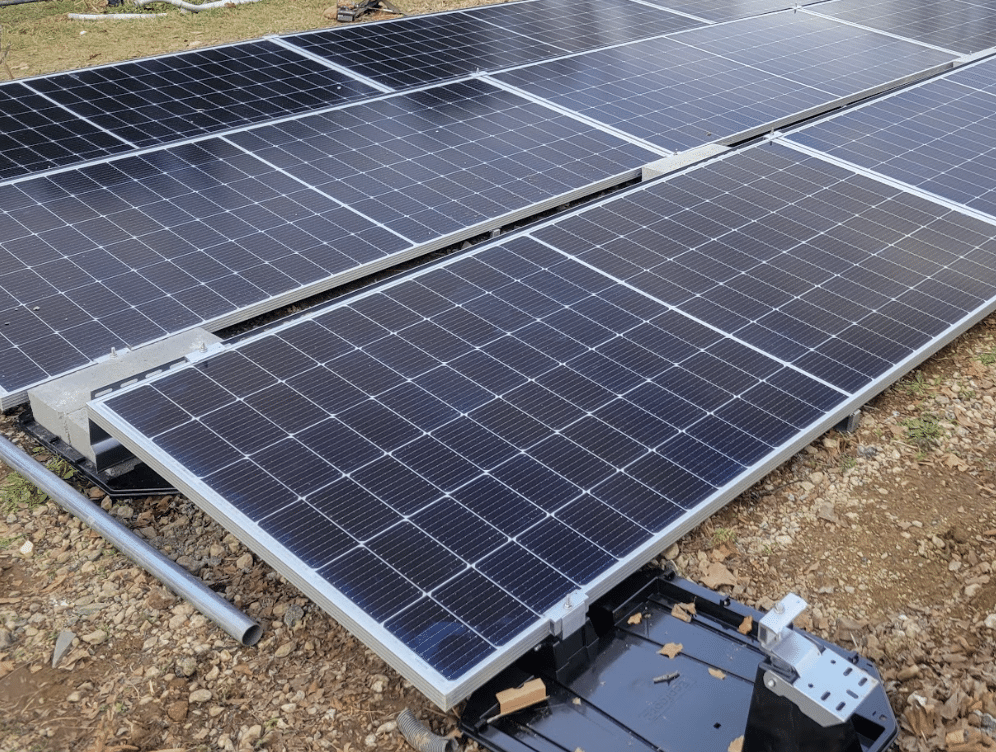
Please note that more modern solar panels have a much more sleek, all-black aesthetic. We’ve chosen a picture of an older panel with visible cells for emphasis.
The Photovoltaic Effect
Solar panels rely on silicon cells that are deliberately treated with additional elements to produce two different types: N-type (negatively charged) and P-type (positively charged). These cells are layered within each solar cell, separated by a semi-conductive barrier.
The N-type cells contain materials providing an excess of electrons, while P-type cells have materials with fewer electrons. This results in an electron-rich layer (N-type) and an electron-poor layer (P-type). When sunlight strikes the silicon atoms in these layers, it delivers enough energy to free some electrons from their atomic bonds.
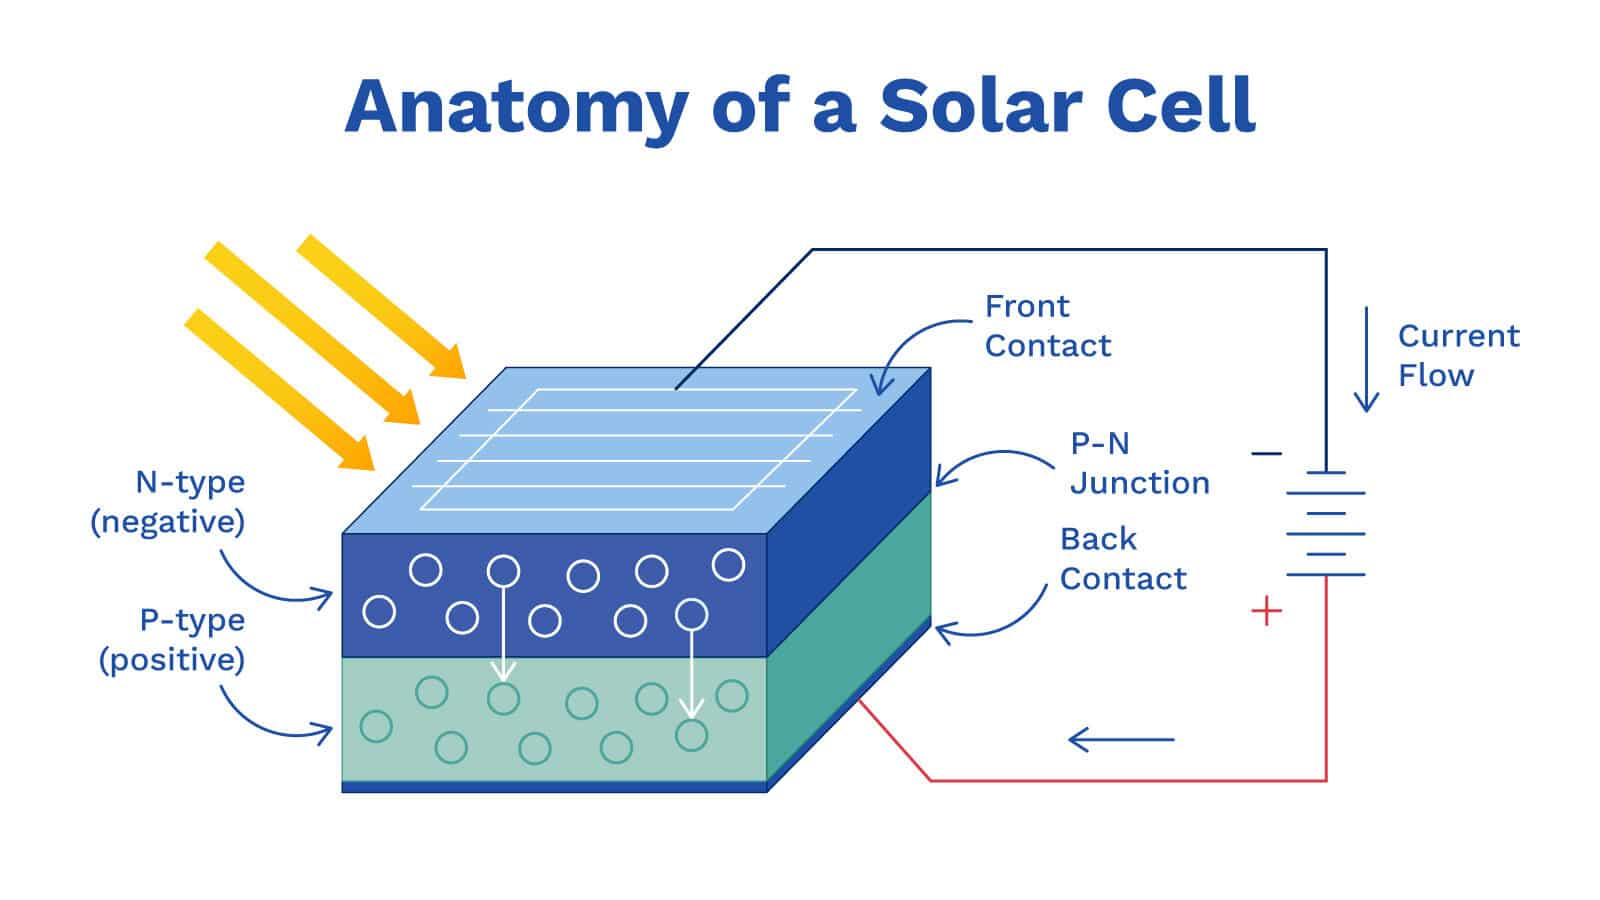
When the N-type and P-type layers are pushed together and exposed to sunlight, an electric field forms at the junction between them. This field sets up a one-way path for electrons. Now, when photons (light particles) from the sun strike the silicon cell, they knock electrons loose from their bonds.
Those freed electrons move across the PN junction, where the N-type and P-type layers meet. As the electrons flow, they create an electric current within the cell. This process generates the direct current (DC) electricity that a solar panel sends to the rest of the system.
Generating Direct Current (DC) Electricity
Each photovoltaic (PV) cell includes metal contacts—one on top, one on the bottom—designed to collect and guide electrons into the electrical circuit. Once those electrons have delivered their energy, they cycle back to the cell’s rear side.
On the front surface, very thin grid lines help gather electrons and funnel them toward busbars, which are metal strips that transfer electrical power. This process runs continuously: as photons from sunlight re-energize the electrons, they move through the circuit, release their energy, and return, ready to be energized again.
The electrons themselves never get used up. They stay in constant circulation, repeatedly picking up energy from sunlight and releasing it as they pass through a load. It’s this ongoing flow of electrons that creates direct current (DC) electricity.
This DC electricity must be converted to AC electricity before it can be used by homes and businesses or sent back to the grid.
This is where inverters come into play.
Inverters
Inverters make solar energy usable. Although solar panels convert sunlight into Direct Current (DC) electricity, DC power is not what runs most homes, businesses, or the broader electrical grid.
These systems rely on Alternating Current (AC) instead. The inverter bridges that gap by transforming the raw power from your panels into the form needed for everyday use.
Outlined below are some of the most common inverter types.
String Inverter
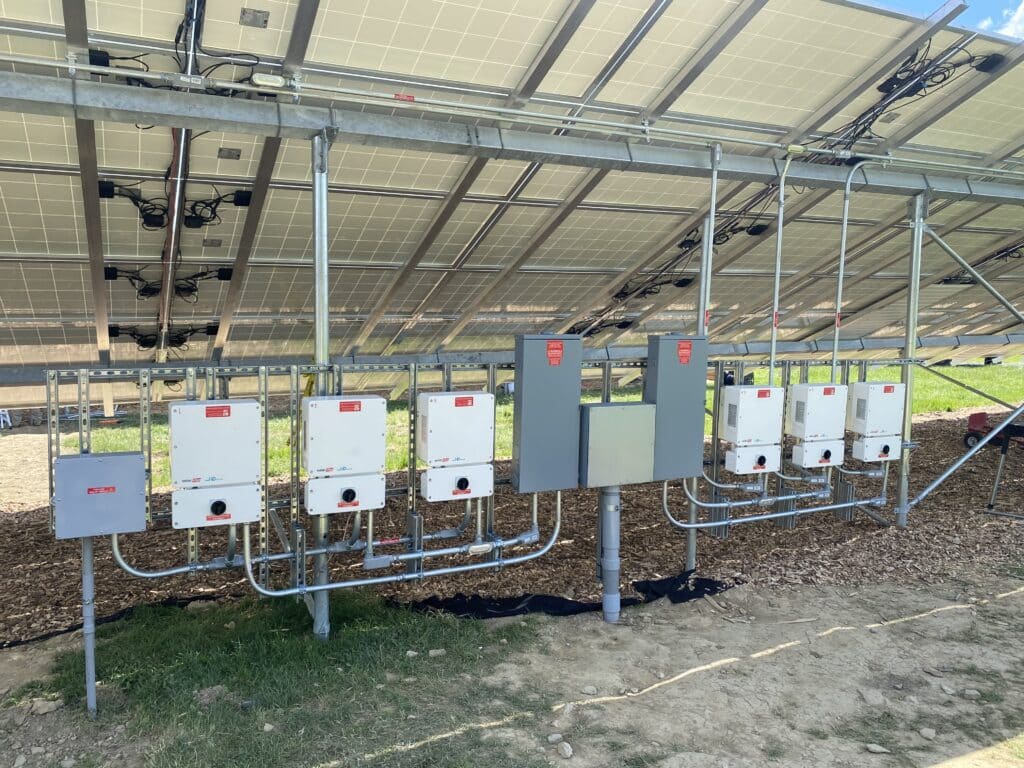
A string inverter gathers power from a series (or “string”) of solar panels and routes it into one central unit. This typically proves the most budget-friendly option, which is why it remains popular in residential settings. Its straightforward installation and cost-effectiveness make it appealing for homeowners looking to minimize upfront expenses.
String inverters work best when panels get uniform sunlight, meaning limited or no shading throughout the day. If even one panel in the string encounters shade or debris, its reduced output can affect the entire chain.
Most string inverters nowadays have the technology to counter this effect, but just a few short years ago, they were similar to a string of Christmas lights: if shade fell across just one panel in the string, the rest would stop producing power.
Microinverters

Microinverters offer a more advanced solution. They sit behind each panel or sometimes are set up as one inverter per two panels. Their main advantage is their ability to deal with partial shading or panels with differing orientations. Since each panel operates independently, shade from a cloud, tree, or chimney won’t cause a dip in output in the rest of the system.
This leads to potentially higher overall energy production for property owners whose roofs occasionally shade. Another benefit is that microinverters allow panel-level monitoring. Property owners can see precisely how each module performs, making it easier to spot and troubleshoot any underperforming panels.
However, this added functionality does come at a slightly higher initial cost, and servicing or replacing multiple small inverters can be more complex than maintaining a single central string inverter unit.
Power Optimizers (Paired with a Central Inverter)
Power optimizers are a compromise between string inverters and microinverters. Like microinverters, each panel has a small device behind it to manage the DC electricity before it arrives at a central inverter. While the inverter converts DC to AC, these optimizers regulate and improve each panel’s DC output.
By placing an optimizer behind each module, system owners can track individual panel performance (similar to micro inverters) and reduce efficiency losses linked to partial shading. However, the upfront cost tends to be higher than that of a basic string inverter setup, though it is still typically lower than that of a fully microinverter-based system.
Racking and Mounting Systems
Racking keeps panels securely in place and positioned for optimal sunlight exposure. These systems must endure harsh weather conditions for decades so that the solar array remains stable and productive for years. Different mounting methods cater to various property layouts, climates, and performance goals.
Below, we will give a closer look at the most common mounting methods.
Roof Mount
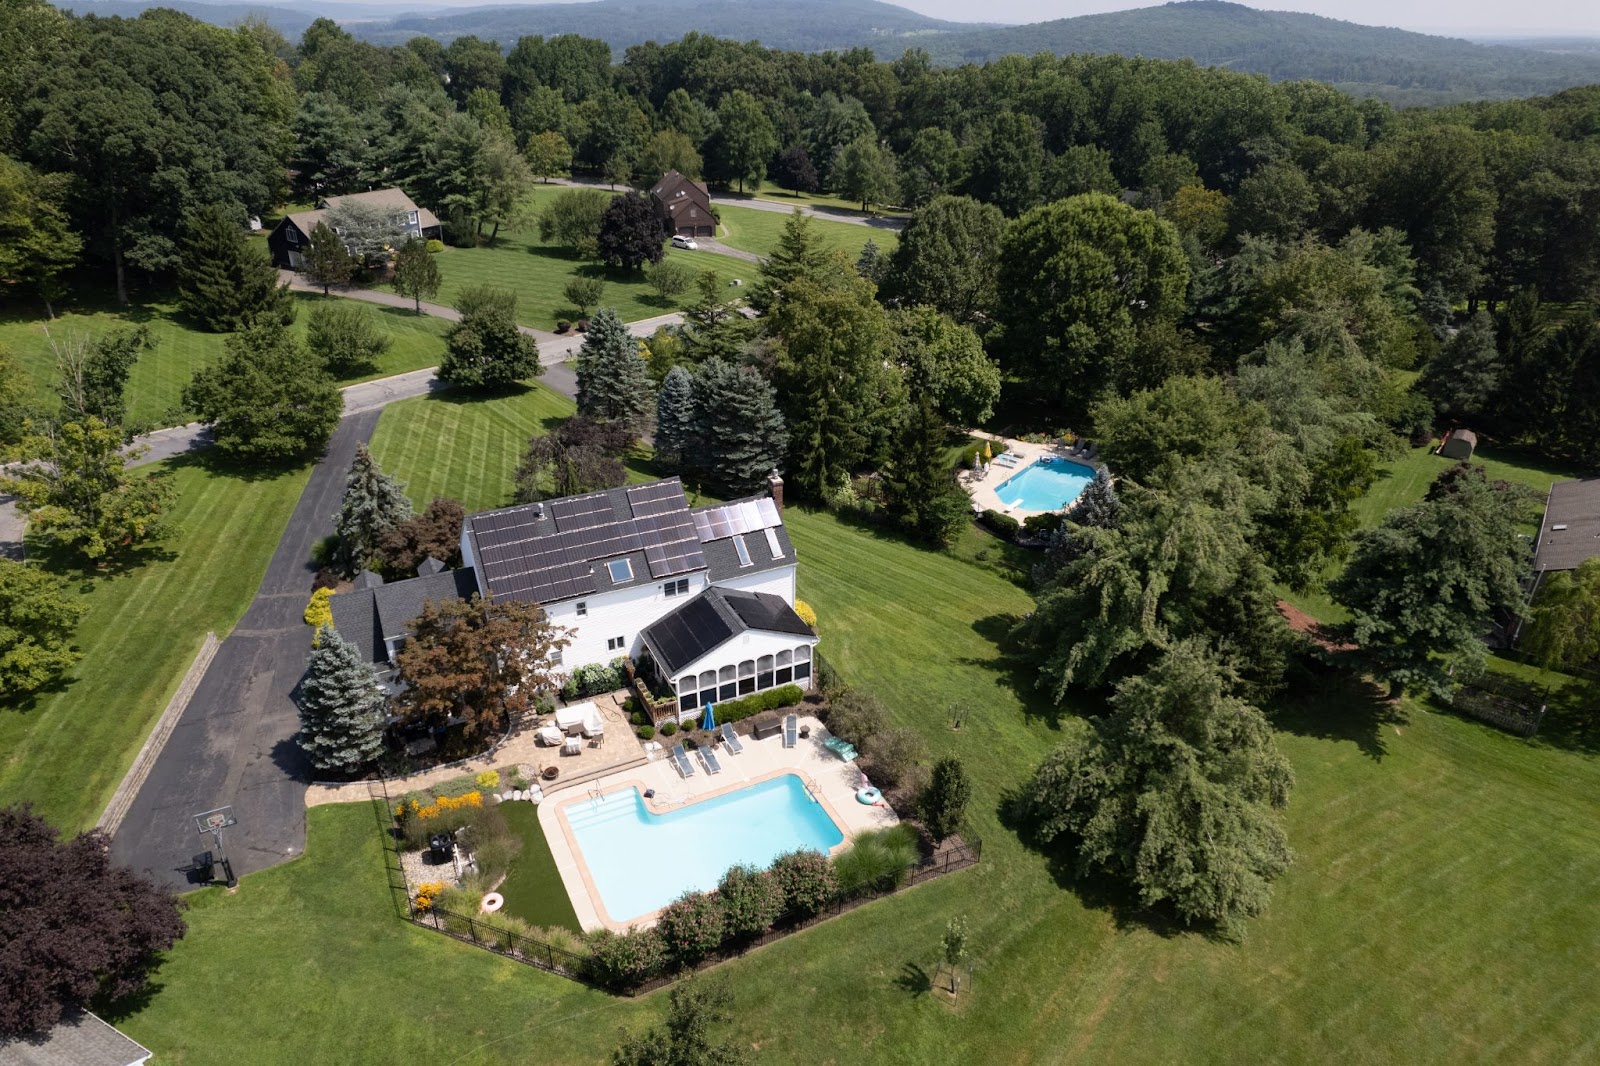
A roof mount setup is often the preferred choice for home solar systems and many commercial rooftops. It is convenient because it utilizes otherwise unused space.
Installers can secure panels without damaging the roof or causing leaks by attaching rails and brackets to rafters or specialized roof anchors. Proper flashing techniques help protect against moisture, ensuring the longevity of the mounting system and the roof.
Solar can be installed on flat roofs, too! Exact Solar installed a solar energy system on our office in Bucks County, Pennsylvania just a few years ago. The office building has a flat roof, so we used a ballasted system instead of mounted racking. This means that the panels on the office are held down by heavy weights, not hardware like screws.
Not all roofs are eligible for solar, however. Roof age, structural soundness, and potential obstructions like chimneys, skylights, or vent pipes can make roofs bad candidates for solar installation.
Ground Mount Systems
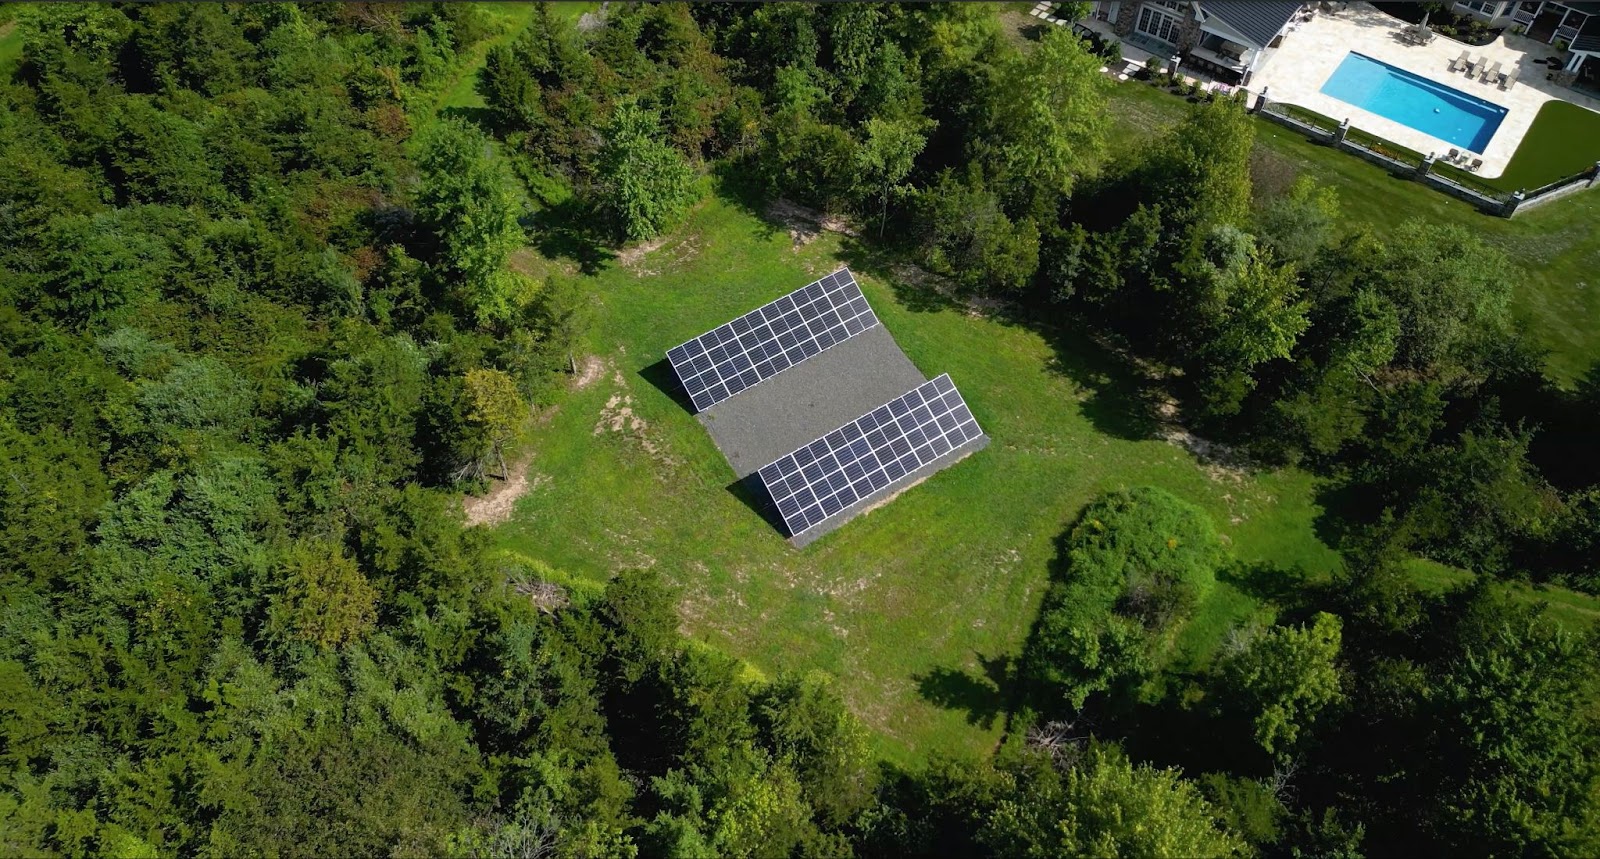
If the roof isn’t suitable for solar or needs a larger system than your roof can accommodate, a ground-mounted system may be the more practical option. Ground-mounted arrays sit on a metal or steel framing structure secured by concrete footings or posts driven into the ground.
Because they’re elevated at a comfortable height, ground mounts are typically easier to maintain and clean. They allow you to clear debris or remove snow more easily than a roof-mounted array.
Additionally, ground mounts offer more flexibility in orientation and tilt angles and allow the use of trackers (typically only used in very large commercial jobs), which can help maximize solar energy production. The main drawback is the need for open land, which can be limited.
Another option is a ballasted ground-mount system. These work best when there’s an open piece of flat land to build on. They are held down by heavy weights and aren’t attached to the ground in any way. However, the concrete weights used to hold them are heavy enough to withstand high winds.
Battery Backup Systems
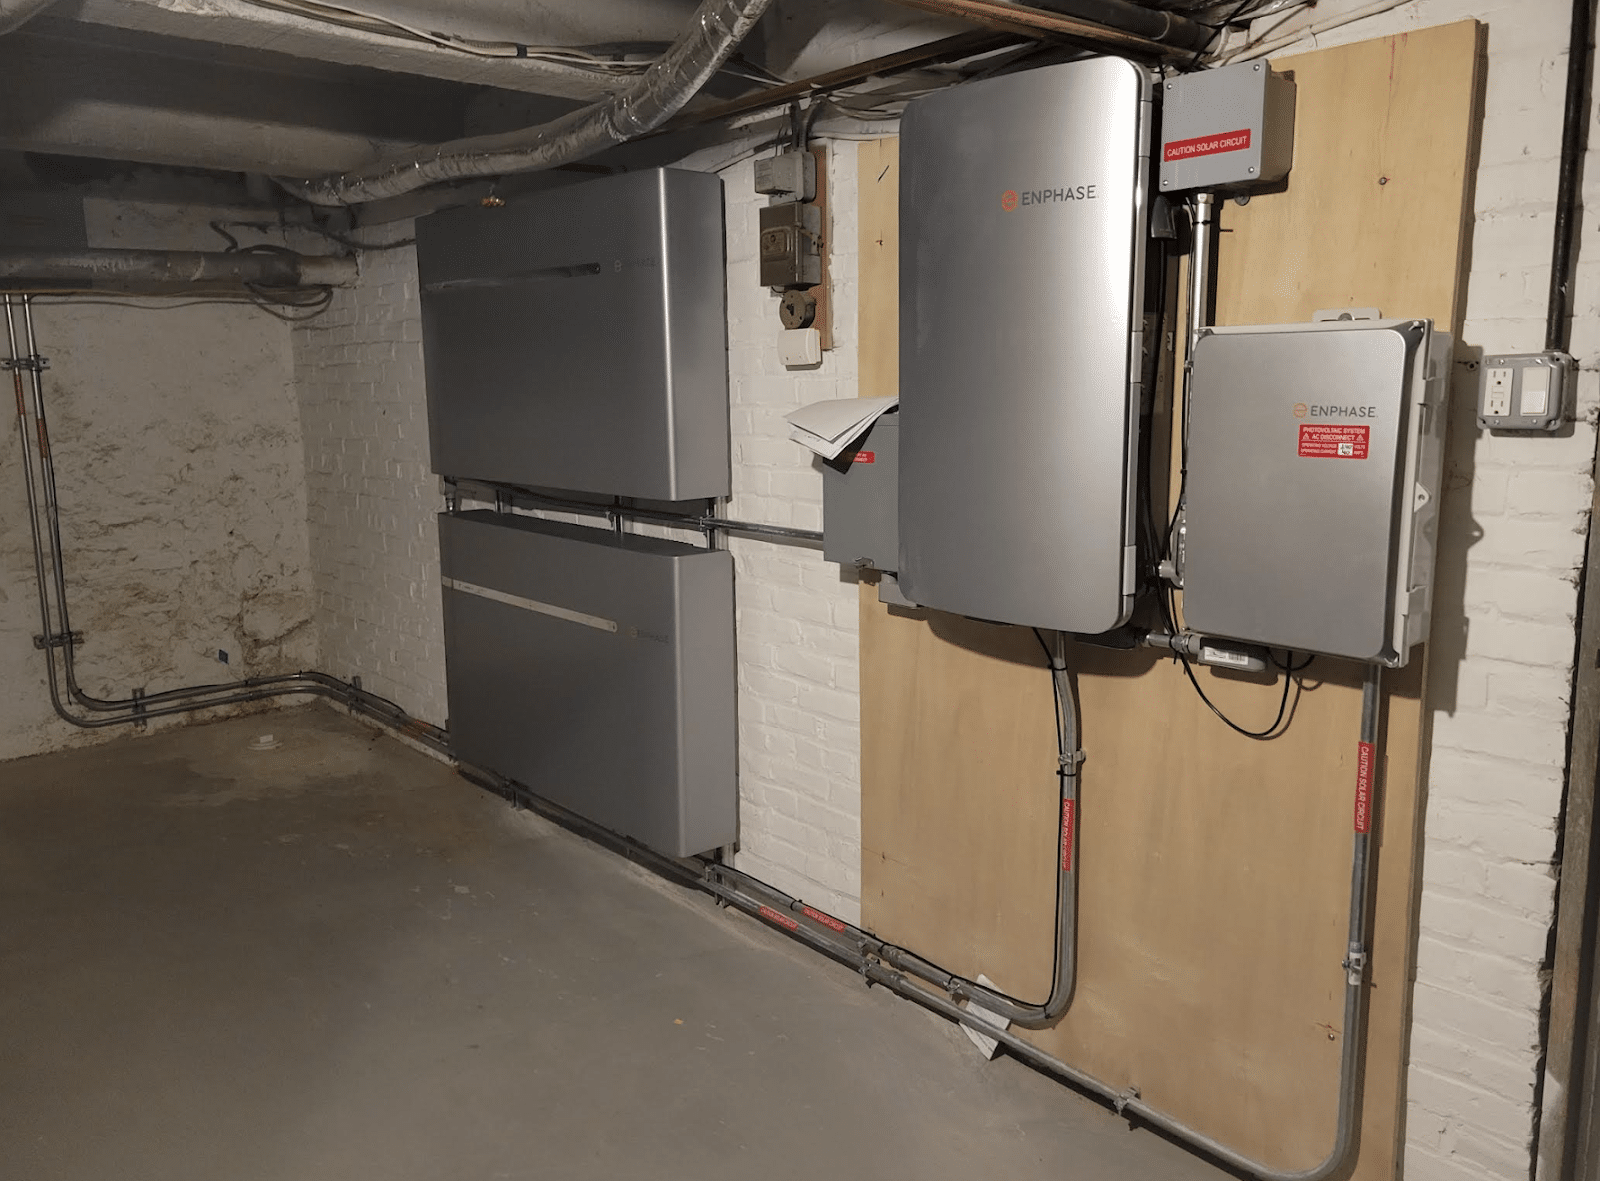
If you want to power an off-grid site or disconnect from the grid completely, you’ll need a battery bank. Batteries store excess energy from the solar system for later use, which is crucial for off-grid systems or backups during grid outages.
Batteries are essential for anyone seeking true energy autonomy. There are several common battery types (flooded lead-acid, sealed lead-acid (AGM and Gel), and lithium-based) but the industry has increasingly shifted toward lithium as the most widely used type for modern solar installations.
While cost-effective, flooded lead-acid batteries require regular maintenance and a ventilated space to manage off-gassing, making them less appealing to homeowners who want a more hands-off approach.
Sealed lead-acid variants, such as AGM (Absorbent Glass Mat) and Gel, simplify maintenance requirements and negate the need for extensive ventilation, yet still have shorter lifespans than lithium.
Lithium-based batteries offer fast charging, deep discharge capacity, and minimal upkeep, which can justify their higher upfront cost for those desiring a long-term, low-hassle solution.
Because lithium is also lighter than lead acid, it reduces stress on flooring or other mounting surfaces, making it suitable for small residential setups to larger commercial and utility-scale projects alike.
Lithium is also more efficient at transferring energy, allowing you to store and retrieve solar power with fewer losses. Whether you’re adding a battery bank to an existing grid-tied system or building a fully off-grid home, lithium’s durability and performance benefits often outweigh the initial investment.
When Batteries Make Sense
Not all solar installations include batteries, but they’re an excellent option for:
- Off-grid living, where there’s no utility power access.
- Backup power during outages in grid-tied systems.
- Time-of-use savings if your local utility charges more during peak hours.
By opting for a battery bank, even when you have grid access, you can store excess energy for times when it’s most valuable or necessary, making your solar power system more versatile and resilient.
Disconnect Switches and Other Balance of System Items
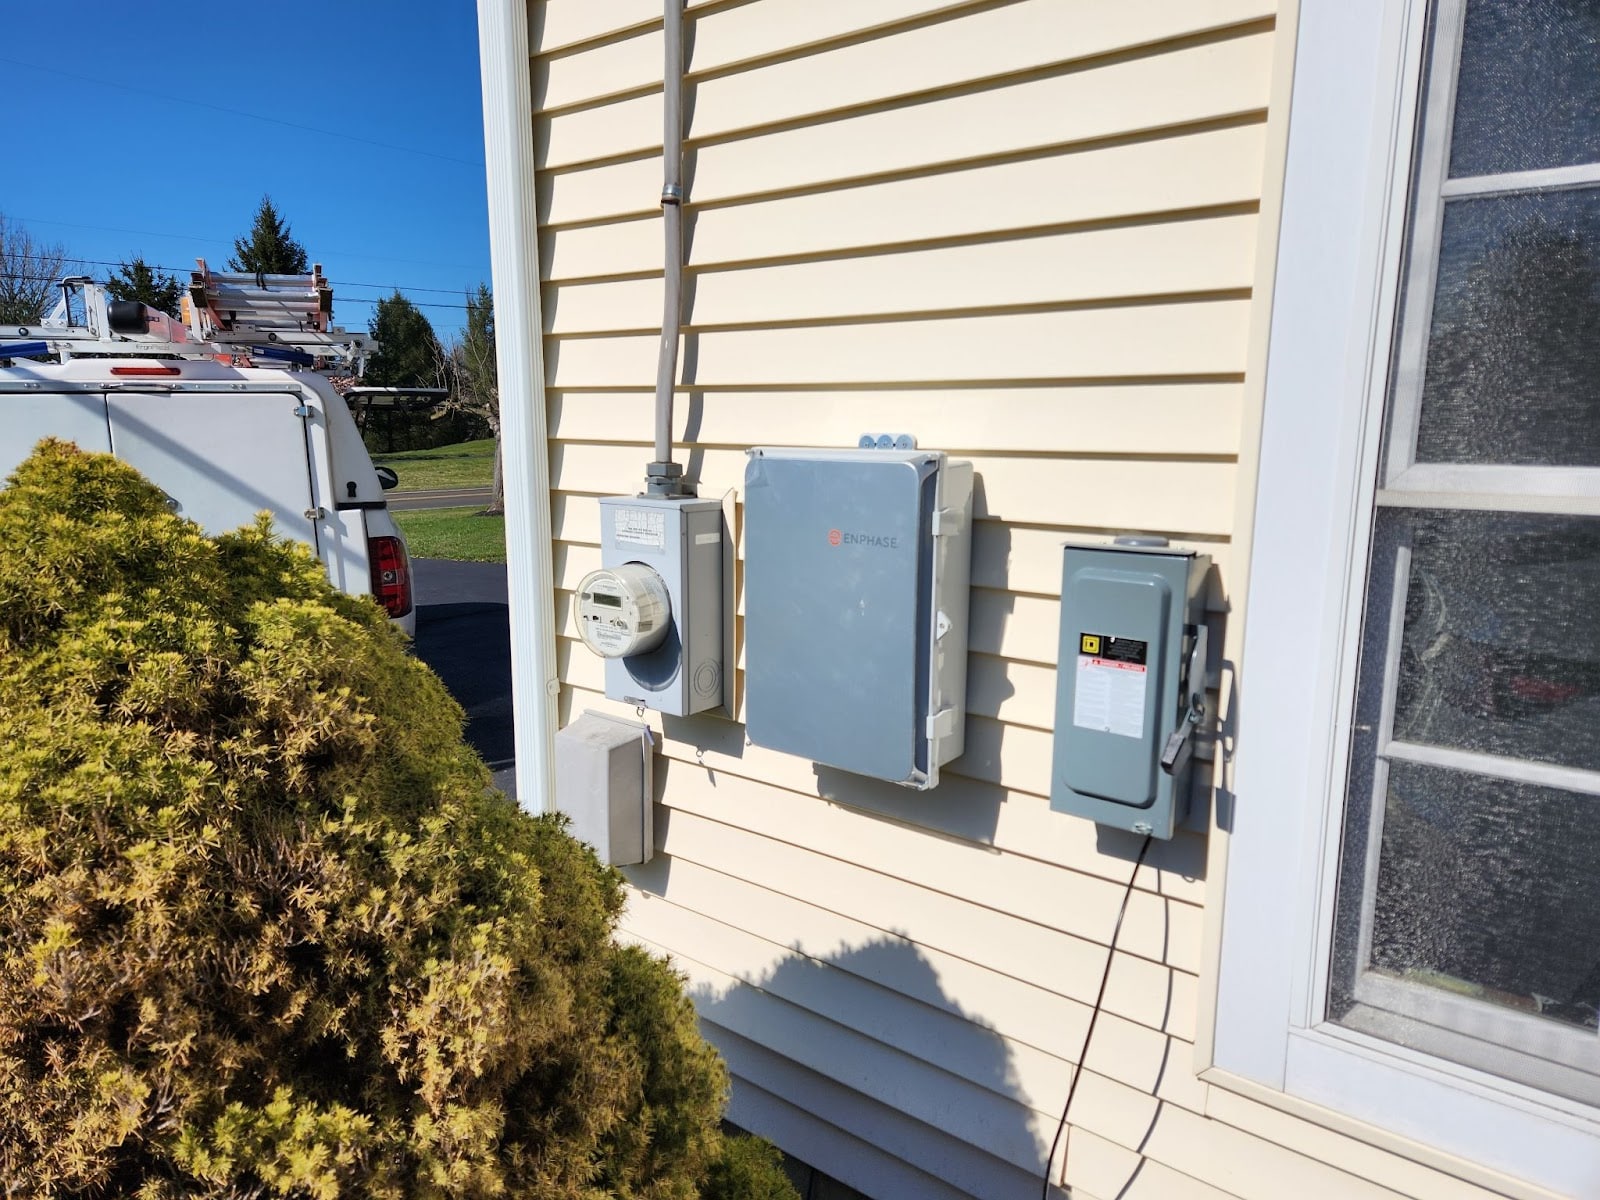
A well-designed solar installation relies on several other components, including solar panels, inverters, and batteries, to ensure safety, reliability, and compliance with electrical codes. These are called Balance of System (BOS) items.
Chief among these are disconnect switches, which allow you to power down your solar array whenever maintenance is needed or in an emergency situation. Typically, most jurisdictions require a DC disconnect (to shut off power from the panels to the inverter) and an AC disconnect (to shut off power between your inverter and the electrical grid or main service panel).
Having both ensures you can safely isolate different segments of your system and protect anyone performing work on the equipment or the surrounding structure.
Beyond disconnects, several other BOS components come into play:
- Combiner Boxes
A combiner box organizes and consolidates the outputs from multiple strings of solar panels into a single feed. If you have several parallel or series connections, the combiner box simplifies the wiring by grouping them in one enclosure. Within the combiner box, there are often individual fuses or breakers protecting each string, preventing a fault in one string from compromising the entire system. This also makes it easier to troubleshoot underperforming strings because each has its own protective device. - Fuses and Breakers
Fuses and breakers are essential for preventing damage caused by electrical faults or short circuits. They automatically disconnect the circuit if the current exceeds safe levels. Fuses blow once and need to be replaced, while breakers can be reset after they trip. In solar applications, string fuses or breakers are sized according to the panel’s voltage and current ratings, and they play a pivotal role in both AC and DC circuits. - Wiring and Conduit
Wiring carries the current from your panels to the inverter, and from the inverter to your electrical panel. The type and gauge of wire depend on system size, voltage, and local code requirements. Conduit provides physical protection to the wiring, guarding against moisture, rodents, and other potential hazards. Properly rated wiring and conduit help maintain system efficiency and reduce the risk of accidents or damage. - Rapid Shutdown Devices
Many modern building and electrical codes call for rapid shutdown capabilities in rooftop solar arrays. These devices reduce the DC voltage to a safe level quickly, often within seconds, when the system is turned off or if a fire occurs. This measure protects emergency responders and minimizes risks associated with high-voltage DC wiring.
By including disconnect switches, combiner boxes, fuses, breakers, wiring, conduit, and rapid shutdown devices, a solar power system stays safe, code-compliant, and easy to maintain.
How Each Component Works Together
A solar energy system operates by capturing sunlight with solar panels and funneling DC electricity to an inverter (or series of inverters). The inverter changes the electricity into AC power for everyday use. If you have a battery, some or all of that AC power can be used to charge the battery. Excess power can be fed back into the grid (in a grid-tied scenario) or stored for later use.
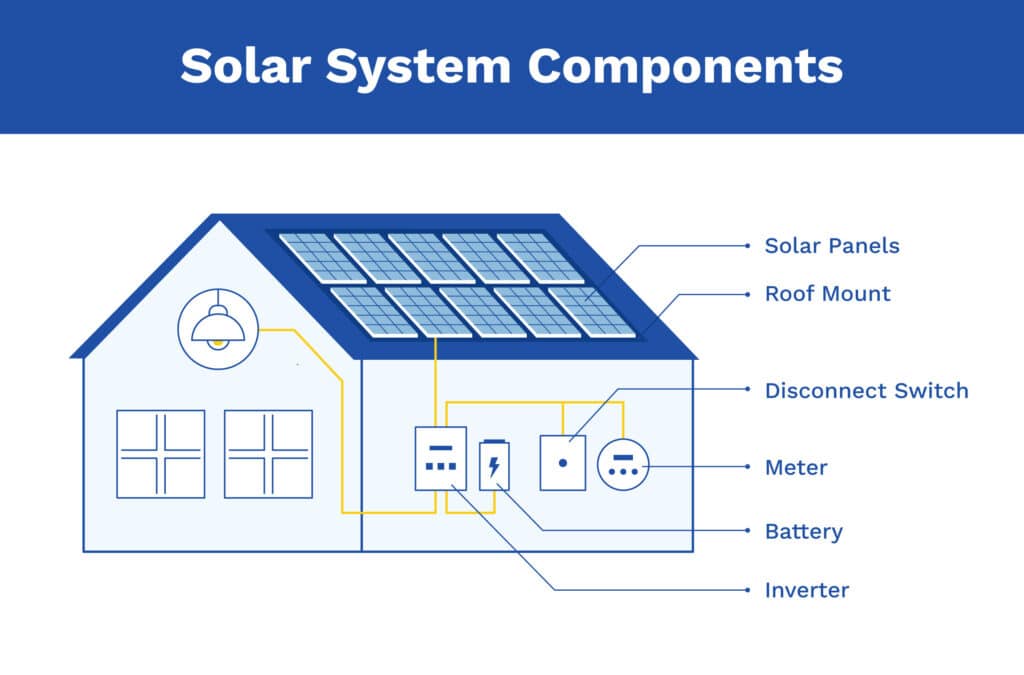
When shading or sunlight conditions fluctuate, the system automatically adjusts, especially if you have optimizers or microinverters, to maximize output. Meanwhile, racking and mounting systems keep your panels secure, and disconnects guarantee you can safely power down if needed.
How Components Are Installed
Sizing Your System
The first step in the process is working with an installer to figure out how large your solar system should be. This involves reviewing energy consumption data—often by looking at past utility bills or, if off-grid, estimating daily usage. This is also where you’ll decide if your system will have battery backup for energy storage if you want time-of-use savings, backup power, or an off-grid setup.
An installer will calculate how many solar panels are needed to meet your goals, whether that’s covering 100% of your annual consumption or just offsetting a portion to reduce utility costs dramatically. Their calculations factor in peak sun hours, local weather trends, and any plans you have for future energy needs (like adding an electric vehicle or expanding your building).
Site Assessment
Before any equipment is purchased or installed, the property itself must be evaluated. Installers (or dedicated site assessors) will look at the available space for solar panels, either remotely or in person.
They will also measure solar irradiance in the area, meaning how much sunlight the location receives throughout the year. Factors like local climate, shading from trees or nearby buildings, and regional weather patterns play a large role in whether your property is eligible for solar.
Selecting the Components
Once your installer knows how many panels you’ll need, they’ll choose specific inverters (e.g., string inverters, microinverters, or power optimizers paired with a central inverter). The type of inverter used depends on the project’s needs and the availability of components from different manufacturers.
At the same time, they’ll choose the racking and mounting system. This will change depending on if your system is roof or ground-mounted.
Installation
Once all components are in hand, the actual build begins. Installers will secure the racking and mounting system to the roof or ground, building a stable structure that can withstand local weather. Next, they’ll place and connect the solar panels, wiring them in series or in parallel, depending on the inverters used for the project.
If your installer is adding a battery and charge controller, those will be integrated at this stage, alongside any disconnect switches, combiner boxes, and rapid shutdown devices required by code.
Inspection and Interconnection
With the physical installation complete, local authorities or your utility company will typically perform an inspection to verify the system meets all electrical codes and safety requirements.
Once the system is approved, it will be turned on and interconnected with the grid, enabling net metering if available in your area. This means any surplus electricity you generate and don’t use immediately can be fed back into the grid, potentially earning you credits on your utility bill.
Monitor and Maintain
After the system is live, it’s vital to monitor performance and carry out routine maintenance. Most setups include a monitoring app or website portal to track daily and monthly output. Periodically cleaning your panels, especially in dusty or snowy climates, helps them perform at their highest possible efficiency. However, if you live in an area with regular rain/snowfall, that should be enough to clean your panels.
Inverters and batteries, if installed, should also be checked on a recommended schedule to ensure they remain in good working condition.
If you have a service agreement with your installer, they can periodically monitor these components and claim warranties for replacement parts on your behalf.
Ready to Take the Next Step?
Going solar is a big decision, and we want you to feel confident every step of the way. At Exact Solar, we take the time to educate our customers, making sure you fully understand how your system operates and whether it’s the right choice for your home or business.
We walk you through the technology, energy production, and financial benefits so you can make a well-informed decision. If solar makes sense for you, we’ll design a system that meets your needs and provides lasting value. If it doesn’t, we’ll be upfront about that too.
If you’re ready to learn more, contact our team for a free consultation. We’re here to help—no pressure, just honest guidance from local solar experts.
